Why You Should Enable 20/40 MHz Coexistence?
You must enable 20/40 MHz coexistence! Why? The reason is, this particular feature helps in preventing interference between wireless networks for sure. When you enable 20/40 MHz coexistence, your Netgear router’s 2.4 GHz radio uses the 40 MHz bandwidth until it detects another broadcast device using 40 MHz. At this point, it falls back to 20 MHz to avoid WiFi signal interference.
Enable 20/40 MHz Coexistence [Importance]
Nowadays, 99.9 percent of people across the globe are dependent on the networking technology. Yes, that’s true and we cannot deny this fact. Everybody in today’s modern world owns a various of WiFi/ networking gadgets in their house. And, Netgear WiFi router is one of them. Remember that, frequencies emitted by Netgear router are tented to get interrupted by radioactive waves emitted by other gadgets/ devices in our home, and, of course, our home appliances. The appliances run on 2.4 GHz frequency which is most likely to interfere with Netgear router WiFi signals.
But, if you enable 20/40 MHz coexistence on your Netgear router, chances of WiFi signal interference will be reduced automatically. On the off chance, your router uses 40 MHz bandwidth from 2.4 GHz frequency and other devices in your home didn’t use the same frequency from the time being, the broadcasted frequency will go back to the 20 MHz band, and in this scenario, the WiFi signal interference will get minimized.
Maximum Data Speeds using 20 MHz and 40 MHz
Refer to the image highlighted below. It will make you understand about the maximum PHY rate per stream in the Mbps (Megabit Per second). Note this down that PHY aka Physical Layer rate is known to providing maximum speed using which you can easily do data transactions through wireless links securely. In other words, it would be the maximum speed that is capable of moving between your client devices like:
- Computers
- Laptop
- Mobile devices
- And your Netgear WiFi router.
How to Enable 20/40 MHz Coexistence?
Here are the step-by-step instructions that will guide you with the process of enabling 20/40 MHz coexistence in no time. Given that, continue reading!
Plug in Your Netgear WiFi Router
To enable 20/40 MHz coexistence, plug in your Netgear WiFi router to a working power source and turn it on. After turning it up, you must wait for the LEDs on it to become stable green upon blinking.
Connect Netgear Router and Your Client Device
Now, the next step in line is to power on your client device (computer or laptop).Once you are done, connect it (your client device) to the Netgear router using an Ethernet cable. If you don’t have the cable, then use a wireless source for connecting them.
Instructions for connecting Netgear router and client device using wired source
- Grab a working Ethernet cable.
- Connect one end of the cable in your Netgear router.
- Then, connect other end of the cable in your client device.
Doing so will help you connect them (client device and router) using wired source.
Instructions for connecting Netgear router and client device using wireless source
- Place your Netgear router and client device closer.
- Navigate to WiFi setting of the device.
- Find the Netgear router’s default SSID.
- Connect the client device with the SSID (WiFi network name) using the WiFi password.
- Advanced
- Advanced Setup
- Wireless Settings
For instance, like we use Netgear_ext for connecting to Netgear extender’s WiFi network – in the same way, we need the router’s SSID to connect with it. The default SSID can be found on the back panel of your device in its manual.
Power on Your Client Device
You need to put your hands on computer or laptop to enable 20/40 MHz coexistence. After that, what you have to do – open a web browser of your choice and enter routerlogin.net in the address bar and press the Enter key. Upon pressing the Enter key, you will be taken to Netgear router login window.
Do Netgear Router Login
The administrative page of your Netgear router displays. Reaching here, you need to input your router’s admin details (username and password) in the fields provided and click Log In.
Default admin credentials of your Netgear router is labeled on the back panel of your Netgear router and can be found in the manual as well. And, if you have customized the login username and password of your Netgear router, consider using the changed one.
Navigate to Wireless Settings
After inputting the correct routerlogin details in the correct fields, you will be redirected to the basic home screen of your Netgear device. Reaching here, select the following options:
The wireless configuration of your Netgear router will display shortly.
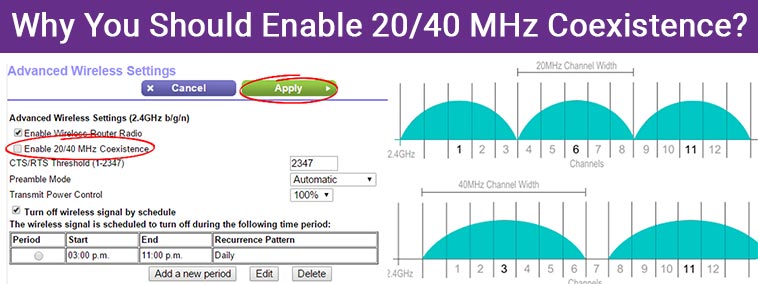
Enable 20/40 MHz Coexistence
Congrats! The ball is in your court! Locate for “enable 20/40 MHz coexistence” check box (without quotes). Once you are done, click Apply to make changes effective.
And, there you are! The process of enabling 20/40 MHz coexistence is successfully completed.
The Last Words
To reduce WiFi signal interference, you must enable 20/40 MHz coexistence. The process of enabling 20/40 MHz coexistence is a piece of cake as you only need to have access over Advanced settings of your Netgear router after logging in to it. We anticipate that you find this blog post easy and helpful.