Netgear AC1750 Setup | Netgear EX6250 Setup
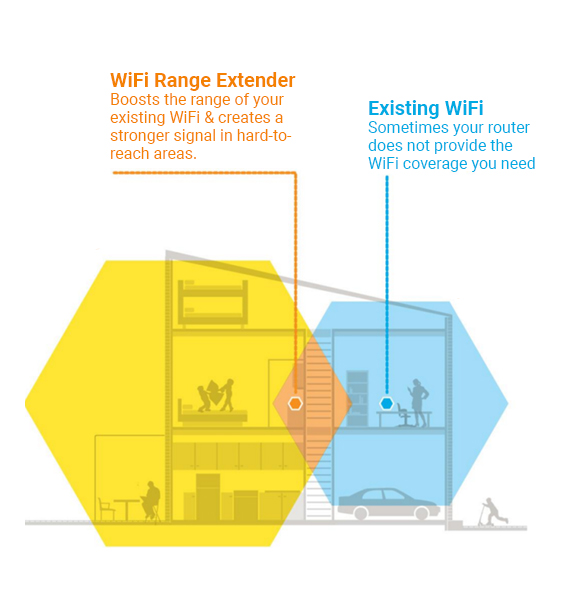
Netgear AC1750 is one of the best WiFi devices for boosting the network range of your existing router. The Netgear EX6250 Setup works well with any standard router and delivers high-speed internet coverage in all areas of your home.
Netgear WiFi Extender EX6250 Setup | AC1750
Common Issues
- The default web address of my Netgear extender is not working
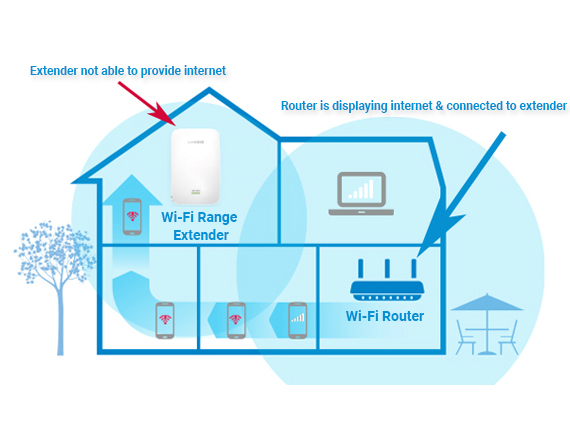
- WiFi extender is connected but no internet
- The WiFi range extender is not connecting to the WiFi network
- Can’t access the default IP address
- Netgear Genie smart setup page continues to appear even after Netgear WiFi extender EX6250 setup
- Not able to access the login page of Netgear AC1750 extender
- Can’t access default web address after a firmware update on EX6250 AC1750
- Netgear range extender is not working
- Netgear AC1750 extender red light causing issues
- Internet connected but my AC1750 extender is not working
Call Toll Free for Support: 1-866-889-0666
Netgear EX6250 Setup | AC1750 Extender
Troubleshooting Steps
Users often face issues while setting up their Netgear AC1750. If you are also getting issues while accessing the login page of your EX6250 AC1750 WiFi extender, then have a look at the below-listed troubleshooting steps for fixing new extender setup issues:
- Make sure that the WiFi extender is receiving proper power supply from the wall outlet.
- Confirm that the wall plugin in which the EX6250 range extender is plugged in is not damaged or short-circuited.
- Access a high-speed internet connection on your WiFi device.
- Check all the wired connections. You are advised to not use any damaged cable.
- Keep your WiFi range extender away from walls, reflexive surfaces, room corners, microwave ovens, fish tanks, cordless phones, Bluetooth devices, refrigerators, metal objects, aluminum studs, etc.
- If you are getting issues with the default web address of Netgear AC1750, be certain that you have entered the correct URL in the address bar.
- Power cycle your Netgear Nighthawk EX6250 AC1750 once and try again.
- Use only the latest version of the web browser during Netgear WiFi extender login.
- Update the latest Netgear firmware version on your EX6250 AC1750 extender.
- Reset the extender to its factory default settings.
None of the aforesaid troubleshooting tips resolve your issues? Don’t panic. We’re here to help! Just contact our technical experts for quick and immediate assistance.
Netgear AC1750 EX6250 Setup
Different Installation Methods
If you want to enjoy a stronger WiFi network coverage everywhere in your home, then first you need to consider doing Netgear AC1750 setup. You can set up the device using various methods. Here we are going to shed light on the manual and WPS method.
Netgear WiFi Range Extender AC1750 Setup | EX6250
Using Netgear Installation Assistant
To perform Netgear AC1750 Setup using the manual method:
- Turn on your Netgear Nighthawk EX6250 AC1750 WiFi range extender.
- Place it closer to your WiFi router.
- Plug your range extender into a power outlet.
- Wait for the Power LED on your device to turn green.
- Connect your WiFi router to the AC1750 extender.
- Launch a web browser and navigate to the default web address for accessing the EX6250 extender login page.
- The NETGEAR installation assistant displays.
- Follow the on-screen prompts to connect your AC1750 WiFi range extender to your existing WiFi network.
- Move your AC1750 extender to a new location that is about midway between your router and the area with a poor WiFi signal.
- If you get no connection or a poor connection, move the range extender closer to your WiFi router and try again until the Link Status LED lights white.
- After you find the best location for your AC1750 EX6250 extender, connect your client devices to the extended WiFi network to start enjoying the use of the internet.
That’s how you can perform the Netgear EX6250 AC1750 setup.
In case you can’t successfully complete the Netgear Nighthawk AC1750 setup process, feel free to reach out to our experts.
Netgear Extender AC1750 Setup | EX6250
WPS Method
To perform Netgear AC1750 Setup using WPS:
- Turn on your WiFi range extender.
- Place your extender close to your router.
- Plug it into a power outlet.
- Wait for the Power LEDs on it to lit.
- Press the WPS button on the AC1750 extender.
- If the Link Status LED lights white, the connection between your router and extender is good. Link Status LED will light blue if the connection is good. If the Link Status LED lights amber or red, move the EX6250 AC1750 extender closer to the WiFi router and try connecting again.
- Move your AC1750 range extender to a new location that is about halfway between your router and the area with a poor router WiFi signal.
- Take your WiFi-enabled computer or mobile device to the location with poor WiFi router coverage.
- Connect your WiFi-enabled computer or mobile device to the extended network.
In case of any assistance, while doing the EX6250 Netgear AC1750 setup, you are suggested to take the help of expert professionals.