Netgear Extender Setup
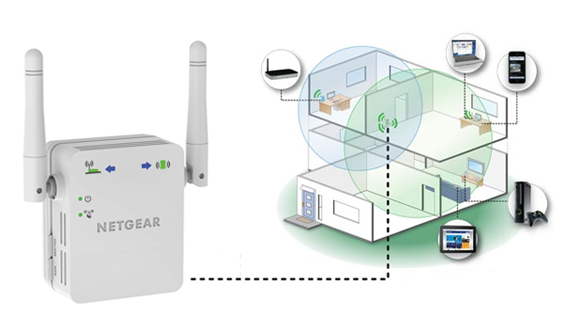
Netgear extender setup is the ultimate way to boost your current WiFi range and speed. Although your typical router has more than enough reach to cover a small home or apartment with WiFi, yet it may unable to cover a larger home. As a result, dead zones will crop up in larger homes where you can’t stream your favorite movie, listen to Spotify, or shop online. In such a scenario, using a WiFi range extender can help you out. Once you are done with the Netgear extender setup, it takes your router’s existing WiFi signals and rebroadcasts them to provide you with WiFi in every nook and cranny of your home. The connection established should be netgear_ext.
There are two main ways to complete your new Netgear WiFi range extender setup:
Let us further guide you with step-by-step instructions for both of these methods.
Call Toll Free for Support: 1-866-889-0666
Netgear Extender Setup – Manual Method
The manual method for the Netgear extender setup requires you to access the default web user interface. Check out the complete steps to set up your WiFi range extender below:
- Plugin your wireless extender to a wall socket.
- Open a web browser on your smart device.
- Visit mywifiext.net web interface.
- Once the login window appears, enter the username and password.
- After that, click the Login button.
- At last, click the Finish button to complete your new extender setup.
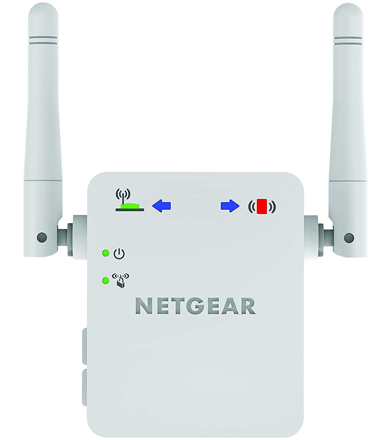
That’s it! Once you see four LED green lights on your extender, it means that your Netgear extender setup has been successfully completed. The new network name will be Netgear_ext (SSID).
Though we have listed all the steps to help you make your extender workable, if you find any technical issue during Netgear extender setup, feel free to contact our highly-experienced technicians via chat or email.
How to Setup Netgear WiFi Extender Using WPS

Found the manual Netgear WiFi extender setup method a bit tricky? If yes, then go for the WPS method. New extender setup via WiFi Protected Setup or WPS method is very simple. Here’s how to setup WiFi extender using WPS:
- Put your WiFi range extender on power.
- Ensure that the power supplied to your extender is fluctuation-free.
- Press the WPS button on your extender.
- Now, unplug your extender and place it to your new desired location.
When all four LED lights on your extender lit up, it indicates that your new extender setup has been done properly.
Netgear_Ext Login
Let’s have a look at the complete steps to perform Netgear_ext login:
- Once you have successfully completed your new extender installation, exit the default web user interface and then the browser you were using.
- Click the WiFi icon to turn it on.
- Type the password in the given field.
Netgear WiFi Extender Setup Issues
Instant Fixes to Help You Out
Netgear Extender doesn’t have an Ethernet Port and the computer doesn’t support WiFi. How to setup Netgear WiFi extender?
For the Netgear WiFi extender setup, there is a need to connect the extender either via WiFi or an Ethernet cable. But what if your WiFi extender doesn’t have an Ethernet port (e.g. EX6200)? Of course, you will go for a WiFi connection. Oh, snap! Your computer has an Ethernet port but doesn’t support WiFi. What to do now?
Don’t fret! In this case, follow the steps below to perform your Netgear WiFi extender setup:
- Turn on your wireless range extender.
- Now, use a smart device rather than your computer.
- After that, launch a web browser on it.
- Head over to the default web user interface of your extender.
- At last, walkthrough on-screen instructions for the Netgear extender setup.
In case of any difficulty, contact our well-versed technicians. They will provide you with easy yet relevant solutions to all your technical issues related to Netgear extender setup.
Connected to Netgear_ext SSID but can’t see the new extender setup wizard
Another issue during the Netgear range extender setup that users commonly face is that the setup wizard doesn’t open even after accessing Netgear_ext (SSID). Improper WiFi connections and other technical glitches are the main culprits behind this issue. Fortunately, you can easily troubleshoot this problem. Just follow a few steps mentioned below and you are done:
- Check whether your computer is set to use DHCP (Dynamic Host Configuration Protocol). If not, set it to DHCP.
- Remember to enter the default login password.
- Re-launch the web browser and try again to access the Netgear extender setup wizard.
- In case you are installing your extender in the Access Point mode, ensure to use a WiFi connection rather than the wired one.
Netgear Extender Red Light Error
Done with Netgear extender setup but still getting red light on it? Well, no need to worry! There are many reasons behind Netgear extender red light error such as:
- Improper extender placement
- Obsolete extender firmware
- Incorrect setting changes
- Congested WiFi channels
- Partial Netgear extender reset
So let’s know how to get rid of Netgear extender red light:
- Relocate your WiFi range extender.
- Power-cycle your extender and router.
- Update your extender’s firmware to the latest version.
- Change the WiFi channel of your home router.
Check the Signal Strength After Netgear New Extender Setup
Do you know how strong is your WiFi signal? Once you are done with the Netgear extender setup, you will get, without a doubt, an increased WiFi coverage. But what about the signal strength? Use the Netgear WiFi Analytics app to get advanced analytics. The app helps you optimize your newly created WiFi network.
So, download Netgear WiFi Analytics app on your device to check your network status, find out congested WiFi channels, know WiFi signal strength, and much more.
Found no WPS button on Router
If you are using the WPS method for new extender setup, there is a need to press the WPS button on your router as well. But what’s that? You find no WPS button on your WiFi router! Worry not! Here are the do-follow instructions to connect your router:
- Press the WPS button on your extender.
- After that, connect your router to the modem via an Ethernet cable.
In this way, you can perform the Netgear WiFi extender setup if there is no WPS button on your router. If you got stuck at any step, take instant help from our skilled technicians via chat.
No Internet after Netgear WiFi range extender setup
This error comes into view because of a partial new extender setup. The latest Netgear extender models like EX8000 have one WiFi name feature enabled by default. This also results in no internet error.
Therefore, make sure to follow each step (given above on this page) carefully during Netgear extender setup. Or disable the one WiFi name feature. And it requires a little technical knowledge, so it’s recommended to take help from our experts to turn off the one WiFi name feature of your extender.
Extender light continues to flash after firmware update
Another common issue that users face is the extender light keeps on flashing after updating the firmware. As soon as you are done with the Netgear WiFi range extender setup, a message will pop up asking you to update your extender’s firmware. But when users do so, the extender light doesn’t turn off. This issue mainly arises in the latest Netgear extender models such as EX7000.
In this case, go through the below-given troubleshooting steps:
- Ensure that your extender is powered on.
- Disconnect your extender from the router and try again.
I’m having trouble logging in to my Netgear extender. What to do?
To troubleshoot the Netgear extender login issues:
- Ensure that the device you’re using to perform Netgear extender login is not packed with excess security i.e. firewalls and antivirus software.
- Check that you’ve typed the correct web address into the URL bar of the web browser to access the Netgear extender login page.
- Double-check the login credentials before clicking the Log In button.
- Verify that the web browser is updated and free of cache, cookies, and browsing history.
Why is my Netgear extender not detecting the router’s 5GHz WiFi signals?
Your Netgear extender might fail to detect the 5GHz WiFi signals if it is unable to establish a connection with the router. To get the problem resolved, follow the troubleshooting tactics given below:
- Locate the WiFi extender close to the main router.
- Check if the router’s 5GHz is working fine on other WiFi-enabled devices.
- If you’ve enabled the One WiFi name feature, consider disabling it and assigning a different SSID to the extender’s 5GHz.
- Consider connecting the extender and router using a damage-free Ethernet cable.
- Ensure that your Netgear WiFi extender is placed in a well-ventilated room.
If even after following the aforementioned steps, your extender fails to detect the router’s 5GHz WiFi signals, get in touch with our well-versed technicians.
Netgear Installation Assistant keeps asking for WiFi password. What to do?
Users need to access the Netgear Installation Assistant in order to set up a Netgear extender. However, some of them have complained about the Netgear Installation Assistant asking for WiFi password again and again. In that scenario:
- Ensure that your Netgear extender is placed at the borderline of the signal range covered by your main WiFi router.
- If you’ve enabled WEP security on the extender, make sure that you’re entering the correct passphrase in the correct field.