192.168.1.250 – Netgear Default IP
192.168.1.250 is the Netgear default IP address that is meant to manage both the basic and advanced settings for your WiFi extender. It is an alternate to mywifiext. In other words, 192.168.1.250 IP is used to log in to your WiFi extender.
It helps you access the Netgear smart wizard that provides you on-screen steps to configure your WiFi extender as per your requirements. The default IP for Netgear lies in the range of 192.168.1.1 – 192.168.1.255 which is class C IP range. Here, we will make you familiar with the process to access http://192.168.1250 for your extender without any hassle. Let’s take the plunge.
http://192.168.1.250 Admin Login Steps
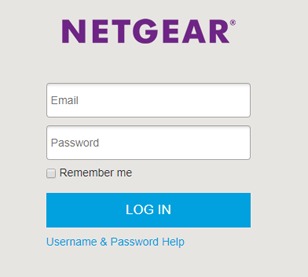
Here are the steps to consider for 192.168.1.250 default IP login:
- Power on your wireless range extender.
- Now, open a web browser on your device.
- Go to http://192.168.1.250.
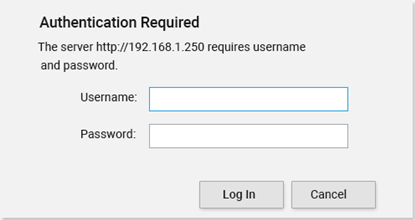
- Enter the username and password into the prompted login window.
- Finally, click on Login button.
Now, you will be taken to the admin panel. Here, you can access the smart setup wizard and change your extender’s settings.
Call Toll Free for Support: 1-866-889-0666
Can’t Access Netgear Default IP Address?
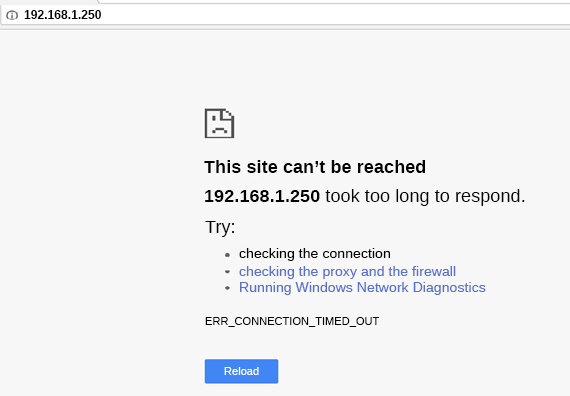
Getting ‘this site can’t be reached’ or ‘http://192.168.1.250 takes too long to respond’ error while trying to access Netgear default IP address? No worries! With a few troubleshooting tips, you can fix the error in a couple of minutes. Before that, let’s get to know why this error appears.
192.168.1.250 – the default IP falls in the category of private IP address defined under RFC 1918 standard protocols. Since the IP address can be used only inside a private network, so users face issues while accessing it.
Other reasons why users can’t access Netgear default IP address are:
- Issues with pre-shared key and SSID
- Unable to establish an internet connection
- Using an incorrect IP address
- The extender is not configured properly
- Intermittent WiFi connection
- Configuration issues with your home router
- IP conflict issue
- DNS-related technical glitches
- Improper wireless range
- Can’t find the server
To fix the issue, execute the step-by-step guidelines listed below:
- Confirm that you are not typing incorrect default IP in the browser window.
- Check the cable connections between your Netgear extender and router. On the off chance if you find any loose cable connections or worn out wires, replace them right away.
- Apart from this, scan your computer to remove any viruses and malware preventing you from accessing http://192.168.1.250 web admin page.
- Switch to another web browser to verify if the issue is not related to your browser.
What Advanced Settings Can I Access Using the Default IP for Netgear?
As soon as you log in to 192.168.1.250 admin page, you will not only be able to perform a new extender setup but you can also access the advanced settings of your WiFi extender. Let’s have a look at the advanced settings you can access after logging in to your wireless extender using the default IP
- Change the extender default password
- Monitor the connected devices to your network
- Set up an access schedule
- Enable or disable WiFi radio
- View and change WiFi settings
- Update the extender’s firmware
- Customize the coverage area of your wireless extender
- Change the WiFi network name
- Deny access to a WiFi device
- Disable the SSID broadcast and create a hidden network
Update Netgear Extender Firmware Using 192.168.1.250
In order to make your WiFi extender work without any issues, it is recommended to keep its firmware version updated. How would do you know if your extender is running the latest firmware or not?
Well, it’s pretty simple. All you need to do is find the model number of your extender and log in to 192.168.1.250. After that, check for the firmware updates for your particular device and download the newest firmware whenever available.
Let’s jot down the complete steps to update your extender’s firmware using the default IP:
- First and foremost, power on your WiFi range extender.
- Once done, access an internet browser.
- Type http://192.168.1.250 in the address bar and click the Go button.
- You will be redirected to the login window.
- As soon as the login screen displays, fill in the username and password to continue.
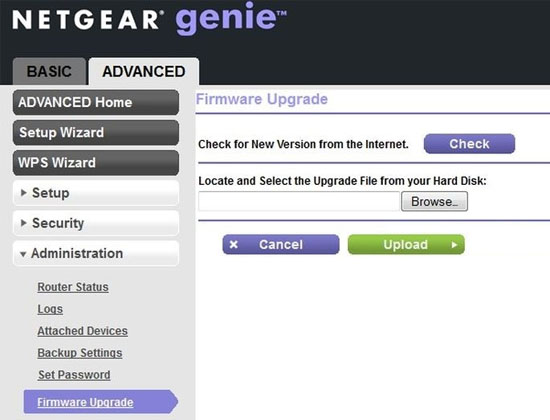
- Now, the Netgear dashboard opens.
- Click the Firmware Update option.
- Browse the firmware file and click the Upload button.
Let the firmware update process be completed. Afterward, restart your extender.
Kudos! You have been updated your extender firmware successfully.
Forgot 192.168.1.250 Login Password? Let’s Recover That!
If you have forgotten the 192.168.1.250 login password, don’t worry! You are still in luck. You can use the password recovery feature to retrieve the forgotten admin password.
Here’s how to recover the login password of your WiFi extender:
- Apply a fluctuation-free power supply to your extender.
- Launch a web browser of your choice.
- Access the default IP.
- Click the Forgot Password option.
- Enter the new password you want to keep.
- Once done, click the Save button to make the changes effective.
And there you are! In case of any difficulty, chat with our highly-experienced technicians via chat. No matter whether you need help in accessing Netgear extender IP or looking for a quick suggestion to fix the Netgear admin password not working issue, we have got your back!